Most layer farms dispose of dead birds. Few examine them. This is the most consistent and most expensive diagnostic mistake in commercial poultry production.
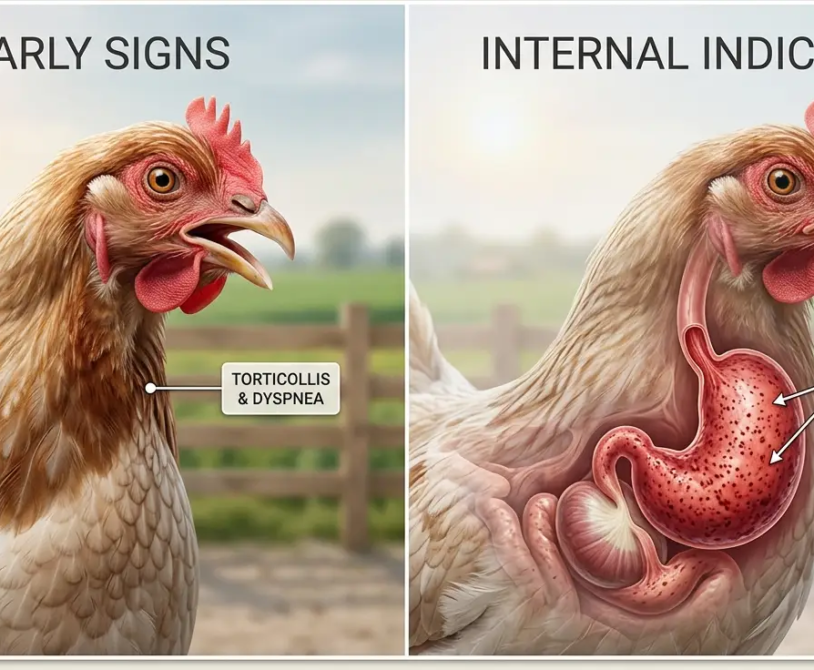
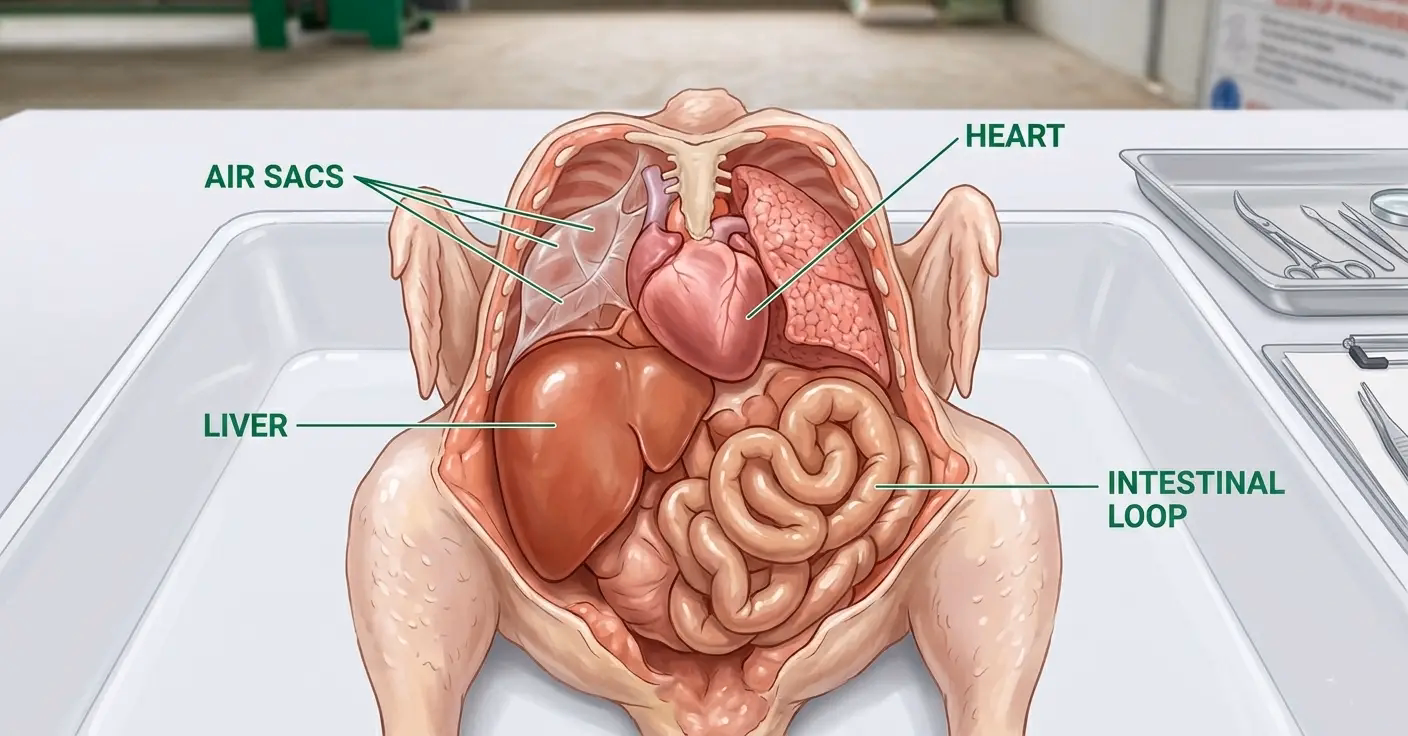
A dead bird examined within 4 hours of death contains more specific, actionable information about what is happening in the flock than a week of production records. The organ changes visible at necropsy — the color of the liver, the condition of the air sacs, the presence or absence of exudate around the heart, the content of the intestine — tell a story about what killed that bird. When that story is read correctly and consistently across multiple birds over time, it tells an even more important story: whether mortality in the flock is random background noise or a developing pattern that will become a production crisis if not addressed.
The farms that manage mortality well are not the farms where birds never die. They are the farms where dead birds are examined systematically, findings are recorded, patterns are recognized early, and management responses happen before a 0.5% daily mortality becomes a 5% daily mortality. The post-mortem examination is the tool that makes that happen.
This article teaches the complete post-mortem examination protocol for layer farms: equipment, bird selection, the examination sequence, organ-by-organ interpretation, recording systems, and the mortality pattern analysis that converts individual bird findings into flock-level management decisions.
Why Post-Mortem Examination Is Non-Negotiable in Commercial Production
The Mortality Rate Context
In a well-managed commercial layer flock, mortality is expected. A laying hen that produces for 72 weeks has a background mortality rate of 0.3–0.5% per month from non-disease causes: cardiovascular failure (sudden death syndrome in peak laying birds), follicular rupture, internal laying, trauma from cage interactions, and the natural end-of-life decline of older birds in late lay.
Any mortality above 0.5% per month warrants investigation. Any mortality above 0.1% per day on a single day warrants immediate investigation. These are not arbitrary thresholds — they are the points at which the probability that mortality is caused by a manageable, correctable condition exceeds the probability that it is random background loss.
The post-mortem examination is the investigation. Without it, a daily mortality rate of 0.15% — slightly above normal, present for two weeks — looks like a stable performance metric. With it, the finding that 9 of 10 birds examined over those two weeks show identical air sac lesions and perihepatitis reveals a developing E. coli colibacillosis event that has been present and treatable since day one of the elevation.
The Diagnostic Value Decay Curve
Post-mortem findings are most informative in birds examined within 4 hours of death. After 4 hours at tropical ambient temperature (28–35°C), autolytic changes begin — organ color shifts, bacteria migrate post-mortem from the gut into surrounding tissues, and the specific lesion patterns that distinguish one disease from another become obscured by decomposition changes.
At 8 hours post-mortem in tropical conditions, the diagnostic value of most soft tissue organs has significantly declined. At 24 hours, most gross pathology interpretations are unreliable.
This time constraint requires that dead bird collection and examination happen the same day, not accumulation in a dead bird bin for weekly examination.
Practical protocol for tropical layer operations: Dead birds found at the morning collection round are examined before 10:00. Dead birds found at the afternoon collection round are examined before 17:00. Birds found dead at night are examined at first light the following morning — within 8 hours under most conditions.
Equipment: What You Need for Field Post-Mortem Examination
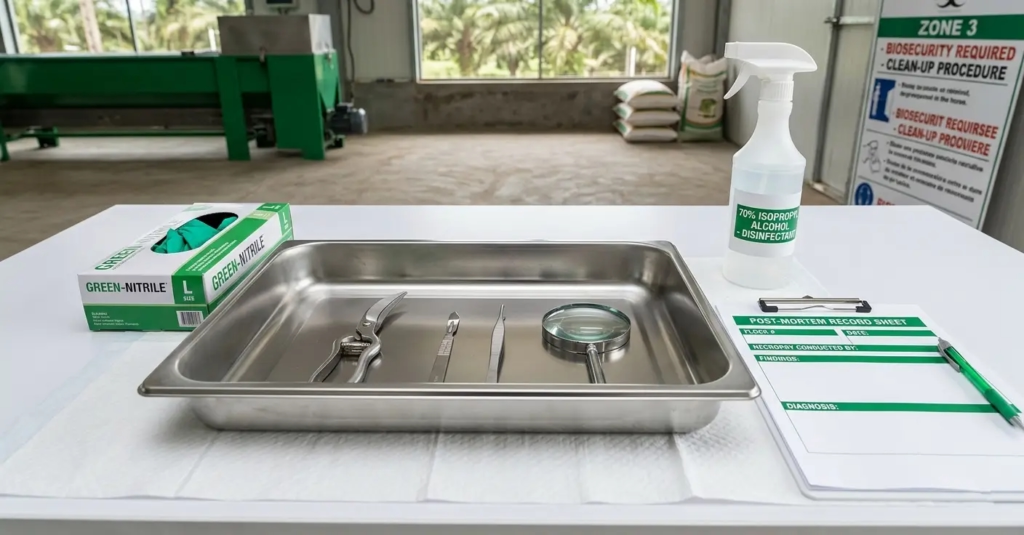
A field post-mortem examination does not require a pathology laboratory. The following equipment is sufficient for systematic farm-level examination:
- Sharp scissors or poultry shears (minimum 20 cm blade): The primary dissection tool for opening the abdomen, chest, and intestine
- Scalpel or sharp knife: For making clean incisions in organs and for scraping intestinal mucosa
- Stainless steel or plastic tray (50 × 30 cm minimum): The examination surface — light-colored to make lesion color contrast visible
- Paper towels: For blotting blood and exudate to reveal tissue surfaces
- Magnifying glass (5–10×): For examining intestinal mucosa, proventricular mucosa, and small lesions in detail
- Gloves (nitrile, disposable): Worn for all examinations — zoonotic pathogens, including Salmonella, Campylobacter, and Erysipelothrix rhusiopathiae, are present in poultry
- 10% neutral buffered formalin (in a screw-top container): For preserving tissue samples for histopathology submission
- Sealed sampling bags: For collecting tissue samples for bacteriology or virology submission
- Examination record sheet (described below)
- Disposal bags: Double-bag all examined carcasses. Carcasses are a concentrated pathogen source and must be disposed of by incineration, rendering, or composting — not open-air disposal.
Do not use the same scissors for multiple birds without cleaning. Wipe blades with 70% alcohol between birds to prevent cross-contamination of findings between carcasses.
Bird Selection: Which Birds to Examine
Not all dead birds carry equal diagnostic information. Selecting the right birds for examination maximizes the information extracted per examination event.
Priority Examination Categories
Priority 1 — The first bird of a new mortality pattern: When daily mortality increases above the baseline for the first time, the first birds from that elevated mortality period carry the most information about the initiating cause. Examine these birds first and in full detail.
Priority 2 — Birds showing the most characteristic signs before death: When a disease event is developing, some birds progress to death faster than others. Birds that showed specific signs before death — respiratory distress, neurological signs, abdominal distension — have the most lesion-rich carcasses because the disease had time to produce its characteristic pathology before the bird died.
Priority 3 — Birds from different locations in the house: If mortality is not uniformly distributed across the house, examine birds from both affected and unaffected zones. The spatial distribution of mortality within a house is diagnostic information — clustered mortality in one zone may indicate a localized environmental problem (ammonia hotspot, water line blockage causing dehydration, lighting failure in a section).
Priority 4 — A clinically normal bird from the same house: Examining one apparently normal bird from the same batch as a disease case reveals whether subclinical lesions are present across the flock or whether the findings in dead birds are specific to those individuals. A flock where dead birds show airsacculitis and clinically normal live birds show the same lesion on examination has a flock-wide disease event. A flock where dead birds show severe airsacculitis and clinically normal birds have clean air sacs has a focal event affecting a subset.
Minimum examination targets: 3–5 birds per mortality event. Single-bird examinations are insufficient to distinguish flock-level disease patterns from individual-bird causes.
The Post-Mortem Examination Sequence
Always examine in the same sequence. A consistent sequence prevents the omission of findings that occur when examination is guided by what appears most dramatic rather than by a systematic protocol.
Step 1 — External Examination
Before cutting, examine the complete external surface of the bird:
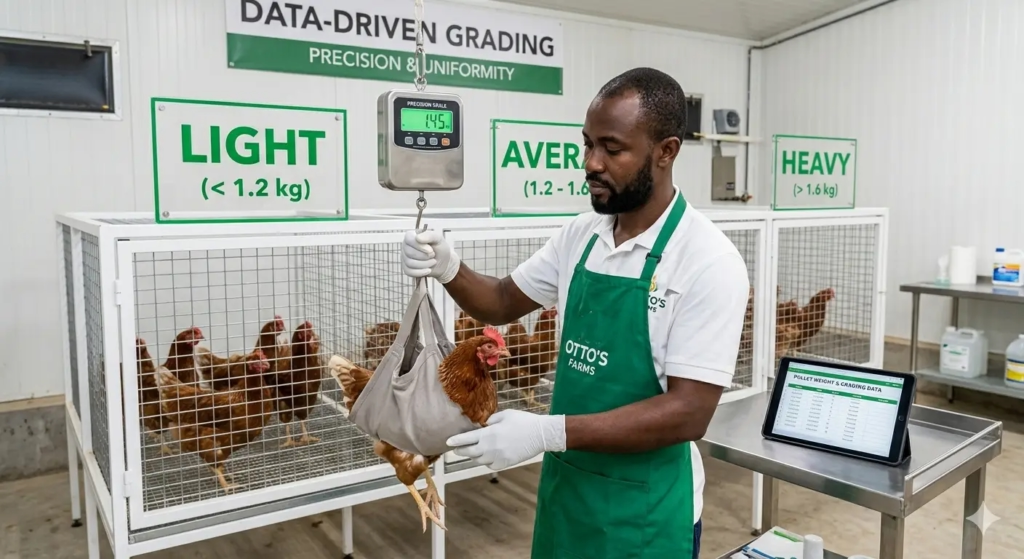
- Body condition: Run the thumb along the keel bone. Prominent keel with minimal muscle = underweight/cachectic. Normal muscle coverage on both sides = adequate body condition. Thick fat pad alongside keel = overconditioned (fatty liver risk).
- Feather condition: Dull, ruffled, or missing feathers in specific patterns (over the dorsal midline = lice; around the vent = mite burden; across the breast and back = feather pecking from flock-mates)
- Skin: Lesions, scabs, hemorrhage, swelling. Examine the head: facial swelling (infectious coryza, respiratory MG), sinus swelling (bilateral vs. unilateral), eye discharge or periorbital swelling
- Vent: Soiled (diarrhea), prolapsed, or normal
- Legs and feet: Swollen joints (Mycoplasma synoviae, viral arthritis), footpad lesions (footpad dermatitis from wet litter), leg deformity (angular limb deformity from nutritional deficiency in rearing)
- Nails and beak: Overgrown (indicates difficulty accessing feeders or drinkers over an extended period); pale nail beds and beak (chronic anemia from mite burden or internal hemorrhage)
- Sciatic nerve (external palpation): Run fingertips along the inner thigh, pressing gently against the femur. The sciatic nerve in a normal bird is not palpable through the skin. An enlarged sciatic nerve from Marek’s disease is palpable as a firm, enlarged cord. Compare both legs simultaneously — Marek’s disease enlargement is typically unilateral initially.
Step 2 — Open the Carcass
Pluck a small area of feathers over the keel and lower abdomen to expose the skin. Wet the feathers first with water to reduce airborne feather and dust dispersal.
Make the primary incision: Hold the bird on its back, legs toward you. Insert the scissors at the midpoint of the keel and cut toward the vent (caudally) to open the abdominal cavity. Extend the cut to the left and right along the costal margin to expose the thorax. Reflect the abdominal wall upward and outward to expose all visceral organs simultaneously.
Pause before disturbing any organ and observe the overall cavity:
- Is there fluid in the abdominal cavity? (Normal: minimal serous fluid. Abnormal: yellow-tinged fluid = egg yolk peritonitis; red-tinged fluid = hemorrhage; clear fluid = ascites)
- Are any organs grossly enlarged?
- Is there fibrin or exudate? Where is it located?
- Is there an unusual odor? (Foul, fetid odor = bacterial peritonitis, usually E. coli egg peritonitis; sweet or slightly fermented smell = normal; no specific odor typically = viral disease)
Step 3 — Systematic Organ Examination
Examine organs in this sequence. Do not remove any organ until it has been examined in situ — the positional relationship between organs is diagnostic information.
Air sacs: Normal: Thin, transparent membranes barely visible. Abnormal findings and their significance:
| Air Sac Appearance | Significance |
|---|---|
| Thickened, cloudy, white-grey fibrinous coating | E. coli colibacillosis (airsacculitis) |
| Caseous yellow-white plaques | Chronic E. coli, or Aspergillus fumigatus (aspergillosis) — distinguish by culture |
| Fluid-filled | Acute bacterial infection |
| Small grey-white nodules on surface | Aspergillus fumigatus infection |
Heart: Normal: Pale reddish-brown muscle, smooth pericardial surface, equal ventricular proportions.
- Fibrinous pericarditis (white fibrin coating on pericardial surface) = E. coli or Mycoplasma systemic infection
- Right ventricular hypertrophy (right ventricle proportionally larger than left) = Ascites syndrome (pulmonary hypertension from Marek’s cardiac involvement, or heavy metal toxicosis)
- Pale, flabby myocardium = Nutritional muscular dystrophy (vitamin E/selenium deficiency)
Lungs: Normal: Pink-red, spongy, filling the thoracic cavity symmetrically.
- Consolidation (grey, firm, non-compressible areas) = Bacterial pneumonia (E. coli, Pasteurella)
- Bright red, hemorrhagic appearance = Acute viral infection (NDV, ILT) or agonal change (examine other organs to distinguish)
Liver: Normal: Dark reddish-brown, smooth capsule, firm texture.
- Pale yellow, enlarged, greasy texture = Fatty liver
- Ruptured capsule with blood clot on surface = Fatty Liver Hemorrhage Syndrome (examine for free blood in abdomen)
- Bronze discoloration, friable texture, enlarged = Fowl Typhoid (Salmonella Gallinarum)
- White or grey nodules scattered throughout = Marek’s disease lymphoma, Avian Leukosis, or Aspergillosis (culture to distinguish)
- Green-black discoloration = Bile staining from bile duct obstruction
- Perihepatitis (fibrinous coating on capsule) = E. coli colibacillosis (part of the triangle of death)
- Small, white stellate necrotic foci = Fowl Cholera (Pasteurella multocida), Listeriosis
Spleen: Normal: Small, dark red, bean-shaped (size of a large grape in an adult hen).
- Markedly enlarged = Marek’s disease, Avian Leukosis, Fowl Typhoid
- Pale, mottled = Marek’s lymphoma infiltration
- Multiple white foci = Fowl Cholera, Listeriosis
Kidneys: Normal: Reddish-brown, three-lobed, embedded in renal fossae.
- Swollen, pale, with white urate deposits in tubules (nephritis) = IBV nephropathogenic strain, gout from excess protein or calcium, calcium nephrosis from early high-calcium feeding
- Pale and enlarged without urate deposits = Viral nephritis, early-stage renal disease
Proventriculus (glandular stomach): Open with scissors along the length.
- Normal: Pink-red mucosa with visible glandular papillae
- Hemorrhagic lesions in the glandular mucosa (erosion or hemorrhage at papillary tips) = Velogenic viscerotropic NDV — pathognomonic finding
- Pale, thickened mucosa with retained food = Worm burden, megabacterium (Macrorhabdus ornithogaster)
Gizzard: Open and examine the keratinized koilin lining.
- Normal: Yellow-green, smooth, thick lining
- Erosion of the koilin layer (ulceration, dark discoloration, sloughing) = T-2 mycotoxin (from contaminated feed), excess dietary copper, propionic acid toxicosis (from incorrect acid inclusion)
Small intestine: Open the full length of the small intestine with scissors.
- Normal: Thin-walled, pale pink mucosa with visible villi; liquid-semi-liquid digesta
- Roundworms (Ascaridia galli) visible in lumen: up to 11 cm long, cream-colored (moderate to heavy burden)
- Tapeworm segments attached to the mucosa or floating in water during washout
- Hemorrhagic streaks in mucosa = Coccidiosis (Eimeria acervulina, E. maxima)
- Necrotic plaques or fibrinous pseudomembrane on mucosa = Necrotic Enteritis (Clostridium perfringens)
- Thickened, orange-peel mucosa = Coccidiosis (E. brunetti)
Ceca: Open both cecal pouches.
- Normal: Pale content, thin walls
- Blood-filled ceca = Cecal coccidiosis (Eimeria tenella) — can be so severe that the ceca appear as solid blood tubes
- Caseous cecal core (white-grey cheese-like plug) = Blackhead (Histomonas meleagridis)
Reproductive tract (laying hens): Examine the ovary and oviduct in situ.
- Ovarian follicular hierarchy: Count and grade the visible follicles — 1 large (F1, pre-ovulatory), 2–4 medium, multiple small white follicles. A hen close to ovulation has a clear F1 follicle at the top of the hierarchy.
- Ruptured follicles with free yolk in the abdomen = Egg yolk peritonitis (internal laying or E. coli salpingoperitonitis)
- Regressed ovary (all follicles small and white, no yellow follicle hierarchy) = Reproductive regression from stress, disease, or end of productive life
- Oviduct content: Open along the length — caseous material (E. coli salpingitis), impacted egg (trapped shell-less or calcified egg obstructing the oviduct), thin dry mucosa (vitamin A deficiency)
Bursa of Fabricius (pullets under 12 weeks only): Located dorsal to the cloaca — open by inserting scissors into the cloaca and cutting dorsally.
- Normal: White, lobulated, firm, size relative to age (approximately 2–3 cm in a 4-week-old chick)
- Edematous, enlarged, cream-colored with yellow exudate = Acute IBD (Gumboro)
- Atrophied, smaller than age-normal = Post-Gumboro immunosuppression, or Marek’s disease involvement.
Recording Systems: The Data That Makes Patterns Visible
A single post-mortem examination produces a finding. A series of post-mortem examinations produces a pattern. The pattern is the management information.
This distinction requires that every examination be recorded in the same format so that findings can be compared across birds and across time. A mental note or a verbal report to the farm manager is not a recording system.
The Post-Mortem Examination Record Sheet
Each record captures:
Bird identity: Date examined, house number, cage row or floor zone, approximate age found, estimated time of death (found at morning collection/afternoon collection / found overnight)
External findings: Body condition score (1–5), feather condition, vent condition, any notable external lesion with location
Organ-by-organ findings: For each organ examined, normal/abnormal — and if abnormal, describe specifically (color, texture, size relative to expected, presence of exudate, presence of lesion)
Intestinal content: Type of droppings in the intestine at examination, presence, and identity of any parasites
Provisional diagnosis: Based on the finding pattern — or “undetermined, submit for laboratory confirmation” if the pattern is unclear
Action triggered: Treatment initiated / laboratory sample collected / veterinarian contacted / no action (within normal background mortality)
The Mortality Trend Chart
On a separate record maintained weekly:
- Plot daily mortality count by house, by week of lay
- Plot the 7-day rolling average mortality rate (%) against the acceptable threshold (0.05% per day = background; 0.10% per day = investigation trigger; 0.2% per day = urgent response)
- Record the primary finding from the post-mortem examination against the mortality date
The trend chart is the early warning system. A rising 7-day rolling average that crosses the 0.10% threshold 3 consecutive days in a row has been developing for those 3 days, and the post-mortem records from those days contain the finding that explains it.
Interpreting Patterns Across Multiple Birds
Individual post-mortem findings reveal the individual cause of death. Patterns across multiple birds reveal flock-level events.
The Four Pattern Types
Pattern 1 — Single consistent finding across all examined birds: Every bird shows the same primary lesion — airsacculitis, proventricular hemorrhage, follicular rupture. This pattern indicates a single common cause affecting the flock uniformly. High specificity for a single diagnosis.
Pattern 2 — Mixed findings with one dominant finding: Most birds show airsacculitis with some also showing pericarditis and perihepatitis. The dominant finding indicates the primary disease. Mixed findings indicate variable disease progression — some birds are earlier in the disease course, some further advanced.
Pattern 3 — Different findings in different birds: Some birds show airsacculitis, some show Marek’s lymphoma, some show egg peritonitis. This pattern indicates multiple concurrent causes — not a single disease event. Each cause requires its own investigation and response.
Pattern 4 — No consistent finding: Multiple birds examined, no pattern emerges, no consistent finding across carcasses. This pattern indicates either background mortality from multiple minor causes or a cause that does not produce gross pathology changes visible without histopathology (early Marek’s, subclinical viral hepatitis, some toxicoses). Submit samples for laboratory investigation.
When to Submit Samples for Laboratory Confirmation
Farm-level post-mortem examination provides a provisional diagnosis from gross pathology. Laboratory examination provides a confirmed diagnosis from histopathology, culture, PCR, or serology. Submit samples when:
- The gross pathology pattern does not match any clear differential diagnosis
- The pattern is consistent with a notifiable disease (NDV, Fowl Typhoid, Pullorum)
- The treatment initiated for a provisional diagnosis has not produced improvement within 5 days
- Mortality is rising despite treatment
- A new production cycle is being planned, and the cause of mortality in the previous cycle was never confirmed
Minimum submission: 3–5 fresh carcasses (4°C, not frozen), plus tissues in formalin from the most representative lesion. Include the completed post-mortem record sheets as the clinical history — they are the first thing a pathologist reads when opening a submission.
Summary
Post-mortem examination of dead birds is the diagnostic discipline that determines whether mortality in a commercial layer flock is monitored, understood, and managed — or counted and discarded.
Every dead bird examined before autolysis confounds the findings and is a data point. Every data point recorded consistently is a trend. Every trend identified before it reaches the crisis threshold is a management response that costs less than the crisis it prevents.
The examination takes 10–15 minutes. The record takes 3 minutes. The pattern analysis takes one look at the trend chart once a week. The return on that investment is early identification of disease events, targeted treatment instead of empirical guessing, and the accumulated diagnostic knowledge that makes the next production cycle’s problem faster to recognize than the last one.
Dead birds are not waste. They are information. Collect it before it decays.