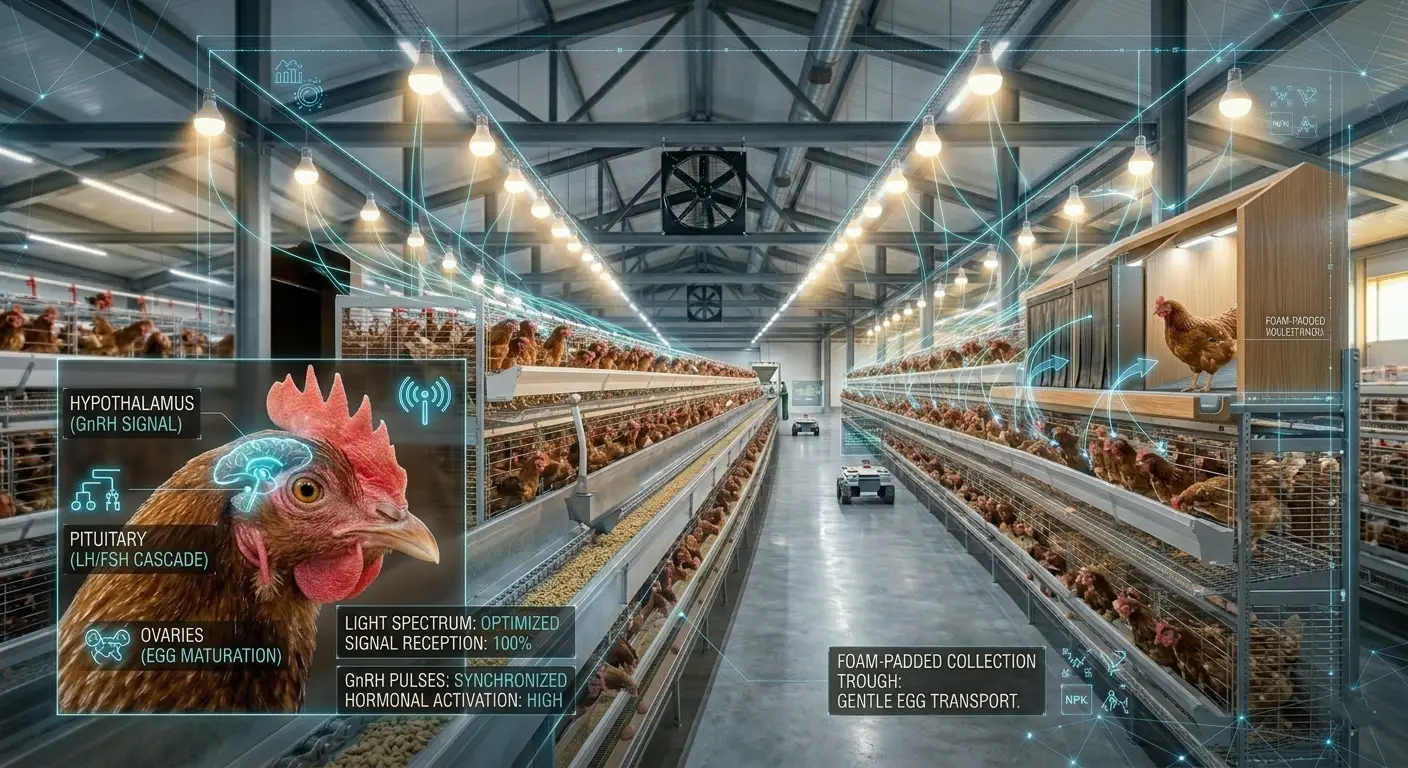
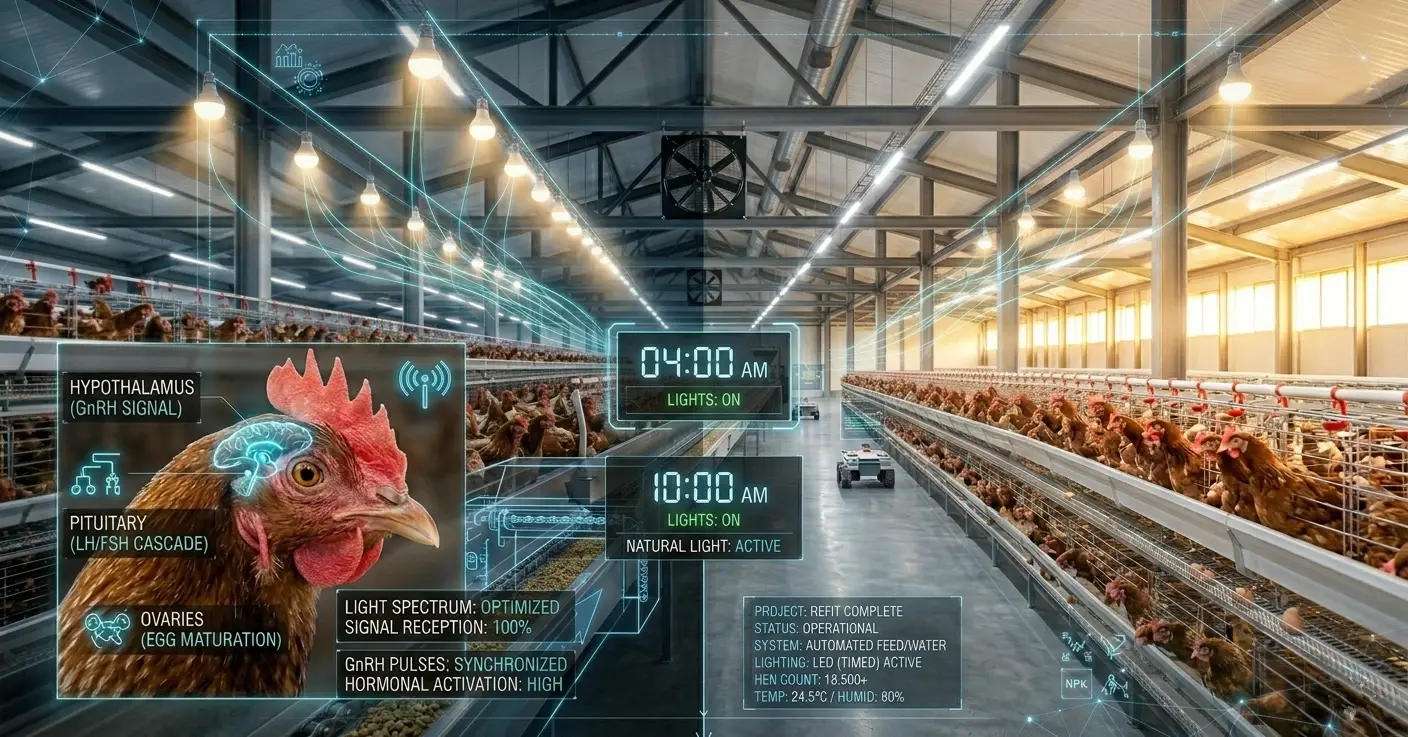
Light is a hormone trigger. In laying hens, increasing day length stimulates the hypothalamus to release gonadotropin-releasing hormone (GnRH), which drives the pituitary to produce luteinizing hormone (LH) and follicle-stimulating hormone (FSH). Those hormones activate the ovary and initiate the laying cycle.
When light is inconsistent, insufficient, or poorly distributed inside the house, that hormonal cascade weakens. The result shows up immediately in production data: reduced lay rate, irregular clutch sizes, and poor shell quality.
Photoperiod management is the practice of controlling the daily light-dark cycle with enough precision to keep hens in consistent reproductive activation. At the infrastructure level, it means choosing the right bulbs, positioning them correctly, dialing in the right intensity, and automating the schedule so the system runs without human error.
This article covers each of those components in practical detail.
The 16-Hour Photoperiod: Why It Works and What It Actually Requires
The standard recommendation for commercial layer hens is 16 hours of light and 8 hours of continuous darkness per 24-hour cycle. This replicates the long days of late spring and early summer — the natural peak of reproductive activity in wild ancestors of domestic chickens.
The 16-hour figure is not arbitrary. Research across multiple-layer breeds consistently shows:
- Below 14 hours of light: laying rate drops measurably
- 14–16 hours: adequate stimulation for most breeds
- 16 hours: optimal stimulation; the threshold above which additional light produces no further benefit
- Above 17 hours: diminishing returns; some studies show reduced shell quality due to disrupted calcium deposition timing
The 8 hours of darkness are equally important. Hens use the dark period for calcium mobilization from bone into eggshell, and disrupting it — even with brief light exposure — interferes with shell formation and can cause stress responses in the flock.
One practical rule: the dark period must be uninterrupted. A single pulse of light during the 8-hour dark window can reset the hen’s biological clock and disrupt laying rhythm.
Bulb Selection: The Four Variables That Matter
Not all light sources perform equally in poultry production. The right bulb must be evaluated on four criteria: spectrum, intensity output, energy efficiency, and lifespan.
1. Light Spectrum
Hens perceive light differently from humans. The avian eye is sensitive to red wavelengths (600–700 nm), which are the primary drivers of reproductive stimulation. Blue and green wavelengths have calming effects and are associated with reduced aggression.
LED bulbs allow spectrum control. Warm-white LEDs (2700–3000K color temperature) emit a higher proportion of red wavelengths and are the standard choice for laying house lighting. Cool-white LEDs (5000K+) provide more blue light — useful during pullet rearing to reduce early sexual maturation, but counterproductive during the laying period.
Incandescent bulbs were the poultry industry standard for decades because their warm spectrum and dimmability suited layer production well. They remain acceptable but are inefficient — consuming 5–6 times more electricity per lumen than equivalent LEDs.
Compact fluorescent lamps (CFLs) are a poor fit for poultry houses. They are slow to reach full output, perform badly in dusty environments, degrade rapidly with repeated on-off cycling, and contain mercury — a disposal liability in commercial operations.
Recommendation: Warm-white LED bulbs rated for agricultural or poultry use. Agricultural-grade LEDs are sealed against dust and ammonia ingress, which significantly extends their operating life in a layer house environment.
2. Illuminance — Getting Lux Right at Bird Level
Illuminance is measured in lux. The critical measurement point is at bird level — the height at which hens actually receive light — not at the bulb or at the ceiling.
Minimum lux targets for layer hens:
| Production Phase | Minimum Lux at Bird Level |
|---|---|
| Brooding (0–6 weeks) | 20–30 lux |
| Rearing/growing (7–16 weeks) | 5–10 lux |
| Transition to lay (17–18 weeks) | 10–20 lux |
| Active laying (19 weeks onward) | 20–30 lux minimum; 30–60 lux optimal |
Below 5 lux at bird level, the photoperiod signal weakens even if the light schedule is correct. Hens cannot receive adequate retinal and extra-retinal light stimulation at very low intensities.
Above 60 lux, aggression and feather pecking increase in non-enriched cage or barn systems. Keep the laying house in the 20–60 lux range for optimal production with manageable behavior.
A lux meter (photometer) costs less than $30 and is the most practical investment in photoperiod management. Measure at bird height at 5-meter intervals along the house length and width before finalizing bulb placement.
3. Energy Efficiency
LED bulbs produce 80–120 lumens per watt. Incandescents produce 10–17 lumens per watt. For a 10,000-bird house requiring adequate lux coverage, the difference in electricity consumption between an LED and an incandescent installation can exceed 85% — a significant operating cost reduction over 5 years.
4. Lifespan
Agricultural-grade LED bulbs rated for poultry environments have operating lifespans of 25,000–50,000 hours. At 16 hours of daily operation, that is 4–8 years before replacement. Standard consumer LEDs in the same environment last 1–2 years due to dust accumulation and ammonia degradation of the driver circuit.
Lighting Layout: Distributing Light Evenly Across the House
Uneven light distribution is one of the most common and underdiagnosed problems in layer house lighting. If one section of the house receives 10 lux and another receives 45 lux, hens in the low-lux zone receive inadequate photoperiod stimulation. That section will underperform regardless of how well the rest of the house is managed.
Bulb Spacing Calculation
The spacing of bulbs depends on bulb output (lumens), mounting height, and target lux at bird level. A practical starting point for most commercial layer houses using 9–12W warm-white LEDs at 2.0–2.5 meters mounting height:
- Bulb spacing along house length: 2.5–3.0 meters
- Bulb spacing across house width: One row every 3.0–4.0 meters in open houses; one row per cage tier in multi-tier cage systems
For houses wider than 10 meters, a single central row of bulbs will not provide adequate light on the sidewalls. Two or three rows across the width are needed.
Reflectors
Standard bulbs emit light in all directions. A significant proportion goes upward toward the ceiling — wasted. Reflector fittings redirect upward-emitted light downward into the occupied zone, increasing effective lux at bird level by 20–40% without adding bulbs or electricity consumption.
In open-plan houses, parabolic reflectors with a 120° beam angle distribute light evenly. In cage systems, narrow-beam reflectors (60°) direct light into individual tier levels without waste.
Avoiding Dark Corners and Dead Zones
End walls and corners are the most common dark zones in layer houses. Place bulbs within 1.0–1.5 meters of end walls rather than starting the first bulb from the center span. Measure lux at all four corners and adjust placement until corner readings are within 30% of the house average.
Timer Systems: Automating the Photoperiod
Manual switching of lights is the fastest path to photoperiod inconsistency. Hens that receive 16 hours of light one day, 14 the next due to a late switch-on, and 17 the day after due to a forgotten switch-off will show irregular laying patterns within two to three weeks.
Timer automation removes human error from the most critical daily management task in the laying house.
Types of Timer Systems
Mechanical interval timers are the most basic option. They use a rotating dial with programmable on-off pins set at 15- or 30-minute intervals. Reliable, inexpensive ($15–40), and require no electricity to maintain. Their limitation is that they cannot adjust automatically for seasonal changes in natural daylight and cannot manage gradual sunrise/sunset simulation.
Digital programmable timers offer precise on-off scheduling to the minute, battery-backed memory that retains settings through power outages, and multiple daily programs. Cost $30–80. Adequate for most commercial operations running a fixed 16:8 schedule year-round.
Astronomical or smart timers calculate natural sunrise and sunset times by location and date, adjusting artificial light to maintain a consistent total photoperiod as natural daylight changes across seasons. Useful in open-sided houses or where light deprivation is impractical. Cost $80–200.
Integrated poultry house controllers combine lighting timers with temperature sensors, ventilation controls, and alarm systems in a single programmable unit. Used in large commercial operations where centralized management across multiple systems reduces labor costs. Cost $500–3,000+, depending on capability.
Timer Installation: Critical Requirements
- Backup power or battery memory: Power outages that reset a timer are a primary cause of photoperiod disruption. Always install timers with battery-backed memory or connect them to a UPS (uninterruptible power supply).
- Separate circuits for lighting and other equipment: Linking lighting to the same circuit as feeders or water pumps means equipment faults can cut lights unexpectedly. Dedicated lighting circuits with separate breakers protect the photoperiod.
- Test every program before birds arrive: Run the full 24-hour cycle manually and verify switch times with a watch before stocking the house.
Sunrise and Sunset Simulation: Dimmers and Gradual Transitions
Abrupt light changes — lights snapping on at full intensity and cutting off completely — cause stress responses in hens. A sudden dark-to-bright transition triggers alarm behavior and temporary disruption of feeding activity. A sudden bright-to-dark transition can cause hens on perches or in nest boxes to be caught in uncomfortable positions.
Gradual light transitions simulate natural dawn and dusk and reduce stress-related production losses.
How to Implement Gradual Transitions
Dimmable LEDs with compatible dimmer switches allow the light level to be ramped up over 15–30 minutes at the start of the light period and ramped down over 15–30 minutes at the end. This requires:
- LEDs specifically rated as dimmable (not all LEDs are)
- A dimmer switch rated for the total wattage on the circuit
- A timer or controller that supports dimming ramp programming
Some integrated poultry controllers have built-in dimming ramp functions. For simpler setups, a separate dimmer with a programmable ramp timer achieves the same result.
The total photoperiod time — 16 hours — includes the ramp-up and ramp-down periods. If 30 minutes of dawn and 30 minutes of dusk are included, the full-intensity period runs for 15 hours to maintain a 16-hour total.
Managing Supplemental vs. Sole-Source Lighting
In naturally lit houses — open-sided or with translucent panels — natural daylight contributes to the photoperiod. The timer system must account for this.
The Additive Approach
In tropical regions with consistent 11–12-hour natural days, 4–5 hours of artificial light must be added to reach 16 hours total. The most effective approach is to split supplemental lighting between early morning and evening:
- Turn lights on 2–3 hours before natural sunrise
- Allow natural daylight to fill the middle of the day
- Extend with artificial light 1–2 hours after natural sunset
This split approach maintains the 16-hour total while minimizing electricity use and protecting the integrity of the dark period at night.
Light-Tight Construction for Full Control
In fully enclosed houses where total photoperiod control is desired, light must not enter through cracks, gaps around doors, or translucent roofing panels. Even low-level light intrusion during the dark period — 0.5 lux from a gap under a door — is sufficient to disrupt the circadian rhythm in hens.
Seal all penetrations with foam or rubber gaskets. Replace translucent roof panels with opaque ones where full photoperiod control is the priority. Inspect the house interior in complete darkness to identify light leaks before the dark period begins.
Transitioning Pullets to Laying Light Programs
How a flock reaches the laying photoperiod matters as much as the laying schedule itself. Pullets reared under long photoperiods (16+ hours) stimulated too early will reach sexual maturity before their body weight supports egg production — resulting in small first eggs, prolapse risk, and reduced lifetime production.
The standard approach:
- Rearing phase (0–16 weeks): Maintain short or stable photoperiod — 8–10 hours. Do not increase light during this period.
- Transition phase (17–18 weeks): Increase light by 1 hour per week to stimulate reproductive development as body weight reaches the target.
- Laying phase (19 weeks onward): Establish and maintain the 16:8 program. Never reduce day length once established — decreasing photoperiod during lay signals the end of the laying season and can collapse production.
The timer system should be programmed for the full rearing and transition schedule before chicks arrive — not adjusted week by week from memory.
Monitoring and Maintenance
Lighting systems degrade over time. Bulbs dim, reflectors accumulate dust, and timers drift. A program that delivers 35 lux at installation may deliver 18 lux after 18 months of operation in a dusty house environment, below the effective stimulation threshold.
Maintenance schedule:
- Measure lux at bird level every 3 months with a photometer
- Clean reflectors and bulb surfaces monthly — dust accumulation reduces light output by 15–25%
- Replace individual failed bulbs immediately; a single dark zone in a cage row affects all birds in that section
- Verify timer switch times quarterly — compare actual on-off times against programmed schedule
- Replace the timer battery backup annually, regardless of condition
Summary
The 16-hour photoperiod is the single most powerful management input in layer production. It costs almost nothing to maintain when the lighting system is properly engineered — and it costs significantly when it is not.
Getting it right requires four things working together: bulbs with the correct spectrum and output for the phase of production, placement that delivers even lux distribution across every square meter of the house, timers that automate the schedule without human error, and a maintenance routine that catches degradation before it affects production.
Every hour of inconsistent light is a direct charge against the laying rate. Infrastructure that removes that inconsistency pays for itself in the first production cycle.