The first week of a piglet’s life is the window during which a series of management procedures are performed that will influence its health, welfare, identification, and market value for the remainder of its productive life. Iron injection prevents the anemia that would otherwise develop universally in confinement-housed piglets by 2–3 weeks of age. Tail docking reduces the risk of tail-biting behavior that causes welfare and production losses in growing pigs. Ear notching creates a permanent individual identification system that supports herd records across the animal’s entire life in the herd. Castration removes the testicular tissue whose secretions would otherwise cause boar taint in the meat of intact males at slaughter.
Each of these procedures requires technique, timing, and equipment that determines whether it is performed correctly — with lasting benefit and minimal welfare impact — or incorrectly, with either compromised effectiveness or unnecessary pain and injury. The difference between a correctly placed iron injection that prevents anemia and an injection that deposits iron subcutaneously rather than intramuscularly, producing a large local reaction without the systemic bioavailability needed for hemoglobin synthesis, is entirely a technique question. The difference between a tail docking that removes the appropriate length with clean technique and one that leaves a stump prone to necrosis is equally a technique question.
This guide builds the complete procedural framework: the correct timing for each procedure (some interact with each other and with other interventions in ways that require sequencing consideration), the step-by-step technique for each, the equipment specifications that determine whether the technique can be executed correctly, the pain management considerations that apply to each procedure in a welfare-conscious commercial system, and the post-procedure monitoring that confirms each procedure has achieved its intended outcome without complications.
The Processing Schedule — Timing and Sequencing
Why Timing Matters for Each Procedure
The separation of processing from golden hour interventions: As detailed in the golden hour guide preceding this one in the series, the first hour of life is devoted to survival interventions — respiratory stimulation, drying, thermal management, and colostrum access. Processing procedures, which add additional physiological stress to the neonatal period, should not compete with these survival priorities. The practical timing for most processing procedures is days 2–5 of life, after the piglet has established adequate colostrum intake, is nursing regularly, and has stabilized its body temperature regulation.
Procedure-specific timing considerations:
| Procedure | Optimal Timing | Earliest Acceptable | Notes |
|---|---|---|---|
| Iron injection (first dose) | Day 2–5 | Day 1 (after colostrum established) | Earlier timing addresses anemia risk; before day 7 is essential |
| Iron injection (second dose, where indicated) | Day 18–21 | Day 14 | For fast-growing piglets in large litters |
| Tail docking | Day 1–7 | Day 1 (after colostrum) | Younger = less pain and blood loss; combine with other processing for minimal additional stress events |
| Ear notching | Day 1–7 | Day 1 | Same timing logic as tail docking |
| Castration | Day 3–7 | Day 2 | Younger = faster recovery; combining with other procedures reduces handling events |
The combination processing approach: Each handling event creates stress for both the piglet and the dam — auditory stress from piglet vocalization, the piglet’s absence from the nursing position, and the general disruption to the litter’s routine. Combining all applicable procedures into a single processing session (iron, tail docking, ear notching, and castration for male piglets) at days 3–5 minimizes the total number of handling events while keeping each individual procedure within its optimal timing window.
Interactions with vaccination timing: As noted in vaccination guidance elsewhere in this series, coccidiosis prevention (Toltrazuril oral dose) is typically administered at day 3–7 and can be incorporated into the same processing session, adding one more intervention without adding another stress event. Processing sessions should not be combined with major immune challenges — do not schedule the processing session on the same day as a farm-wide vaccination or disease challenge event.
Iron Injection — The Non-Negotiable First Procedure
Why Every Confinement Piglet Needs Iron
As detailed in nutritional deficiency guidance earlier in this series, the neonatal piglet is born with minimal iron stores and has no access to the soil iron that would naturally supplement its dietary intake in outdoor systems. Sow’s milk is naturally very low in iron — providing adequate nutrition in most other respects but delivering far less iron than the rapidly growing piglet’s expanding blood volume requires. Without supplementation, iron-deficiency anemia develops universally in confinement-housed piglets by 2–3 weeks of age.
The anemia timeline: A piglet at birth has body iron stores of approximately 50 mg. Its daily iron requirement for normal hemoglobin synthesis is approximately 7–15 mg/day (higher requirement for faster-growing piglets in large, well-milked litters). Sow’s milk supplies approximately 1 mg iron per day. Without supplementation, iron stores are depleted within 7–10 days, and clinical anemia — with its characteristic pale appearance, rough “baby-doll” coat, labored breathing, and growth depression — develops by 14–21 days.
Injectable Iron Products
Iron dextran (most commonly used form):
- Standard dose: 200 mg elemental iron per piglet
- Standard volume: depends on product concentration — most commercial products are 100 mg/mL (so 200 mg = 2 mL) or 200 mg/mL (so 200 mg = 1 mL); verify the specific product concentration before drawing up the dose
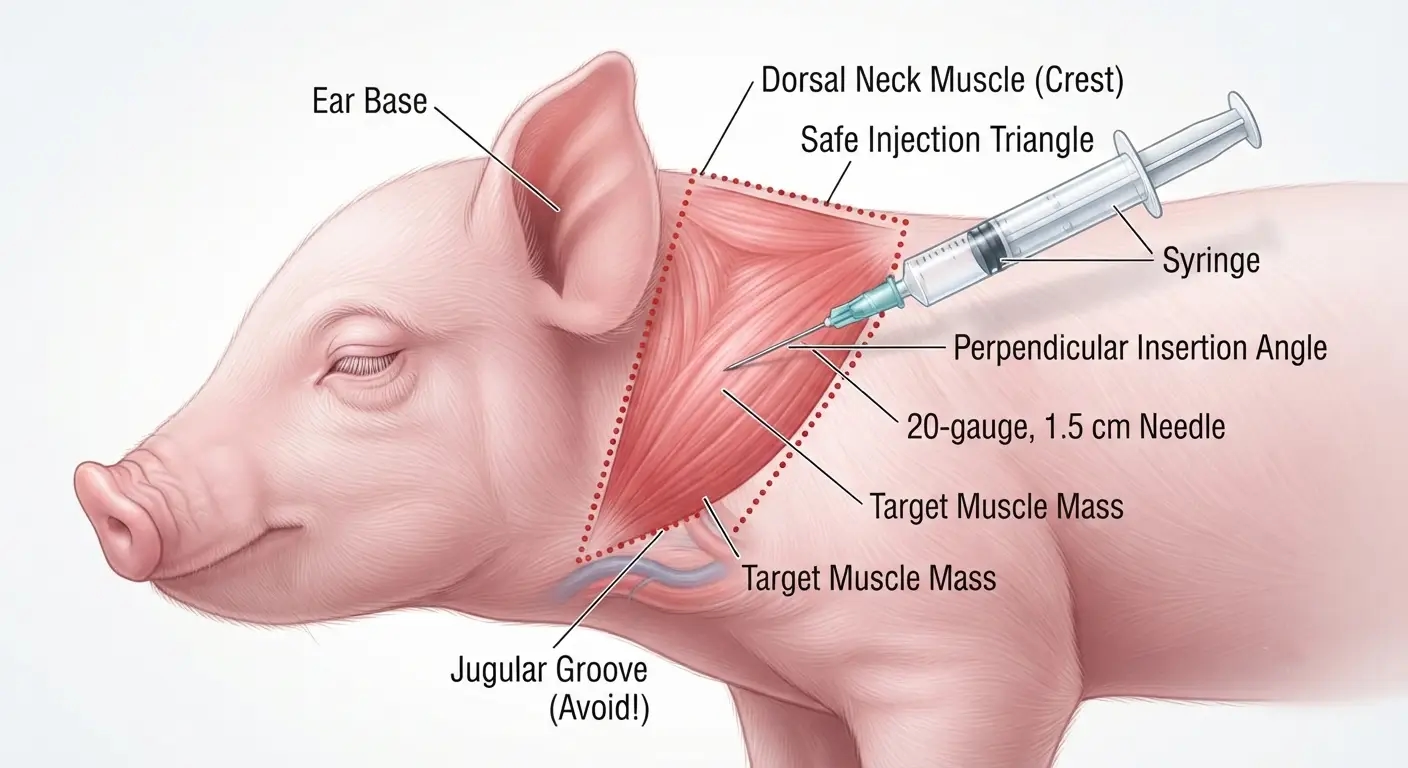
- Route: intramuscular, in the neck muscle (following the injection site principles detailed in needle gauge and injection guidance elsewhere in this series)
- Needle: 20 gauge, 1.5 cm (⅝ inch) for neonatal piglets at day 2–5 weight (typically 1.5–3.0 kg)
Iron gleptoferron (alternative formulation):
- Available in some markets as an alternative to iron dextran; similar dose and route principles; verify product-specific guidance
Step-by-Step Iron Injection Procedure
Step 1 — Prepare the equipment:
- Verified iron dextran at room temperature (cold iron dextran from refrigerated storage is more viscous and more painful on injection — allow the product to reach room temperature before use)
- Syringe loaded with the correct volume for the specific product’s concentration
- 20-gauge, 1.5 cm needle (new needle for each litter, changed every 15–20 piglets within a large litter)
Step 2 — Restrain the piglet:
- Hold the piglet securely in one hand, with the piglet’s back against the palm of the holding hand and its head positioned away from the injection site access
- For a right-handed injector holding the syringe in the right hand: hold the piglet’s body in the left hand with its head to the left, exposing the right neck area for injection access
- The piglet will vocalize when restrained — this is expected and unavoidable; minimize restraint duration to reduce total stress
Step 3 — Locate the injection site:
- The standard neck injection triangle described in injection guidance — the area behind the base of the ear, below the dorsal neck, above the level of the jaw
- Avoid the area immediately behind the ear (ear cartilage base) and avoid the jugular groove along the lower neck margin
Step 4 — Insert the needle and inject:
- Insert the 20-gauge needle perpendicular to the skin surface, with a single firm motion to full needle depth (1.5 cm is appropriate for the muscle mass available in a 2–3 kg piglet)
- Aspirate briefly — no blood should appear with correct placement in neck muscle
- Inject the full calculated dose steadily (not rapidly — rapid injection of iron dextran can cause a larger local reaction at the injection site)
- Withdraw the needle in the same line as insertion
Step 5 — Observe post-injection:
- Brief gentle pressure at the injection site after needle withdrawal reduces any leakage and associated staining
- Return the piglet to the litter promptly
- Document as completed in the litter record
Post-injection monitoring: The injection site should show no significant swelling, heat, or abscess formation. A small, temporary firmness at the injection site is normal and resolves within days. A large, persistent swelling indicates subcutaneous (rather than intramuscular) placement — the dose should be repeated at a new site, correctly placed intramuscularly, as subcutaneous iron dextran is poorly absorbed and may cause a significant local reaction.
Anaphylaxis awareness: Severe allergic reaction to iron dextran injection is rare but documented — a piglet showing sudden collapse, rigidity, or acute respiratory distress within minutes of iron injection should be treated as a possible anaphylactic reaction. Epinephrine (adrenaline), where available in the farm kit, is the emergency treatment. This reaction is uncommon enough that it should not deter routine iron injection — the risk of anemia from non-injection is substantially greater than the risk of anaphylaxis — but should be known by anyone administering iron injections.
Tail Docking
Why Tail Docking Is Practiced
Tail biting — a damaging behavior in which pigs bite and injure each other’s tails — is one of the most significant welfare and production problems in intensive commercial pig production. Once established in a pen, tail biting can rapidly escalate from initial nibbling to severe lacerations, exposed vertebrae, and systemic infection in bitten animals — creating welfare emergencies requiring culling or intensive treatment, and potentially spreading to multiple animals in the pen through the blood and tissue damage that escalates the behavior.
Tail biting has multiple predisposing causes that should ideally be addressed through management (adequate space, enrichment, correct nutrition, appropriate temperature) rather than through routine tail docking alone — but the practical reality of commercial production is that these management factors are not always perfectly controlled, and even in well-managed systems, tail biting incidents occur with sufficient frequency that tail docking provides a meaningful risk-reduction intervention.
The mechanism: A shorter tail (achieved by docking) reduces the visible, accessible target that initiates tail-biting behavior in pen-mates. It does not eliminate the behavioral predisposition — a pig inclined to bite will find other targets — but it reduces the probability of the initial tail-biting behavior occurring and escalating.
Welfare Considerations and Legal Context
Pain: Tail docking is an invasive procedure causing acute pain. In welfare-conscious commercial systems, pain management (addressed in Part 5) is appropriate for all processing procedures including tail docking.
Regulatory context: Routine tail docking is restricted or prohibited in some jurisdictions (banned as a routine practice in the EU, permitted only when other husbandry improvements have failed to prevent tail biting) and permitted in others. Verify the current regulatory position in Cameroon, Nigeria, and the specific production country before implementing a routine tail docking program — regulations in this area have been evolving.
The management-first principle: Tail docking should accompany, not substitute for, the management improvements that address the underlying causes of tail biting — adequate space allowance (as detailed in space allowance guidance in this series), environmental enrichment to redirect oral exploratory behavior, correct nutrition, appropriate stocking density.
Equipment for Tail Docking
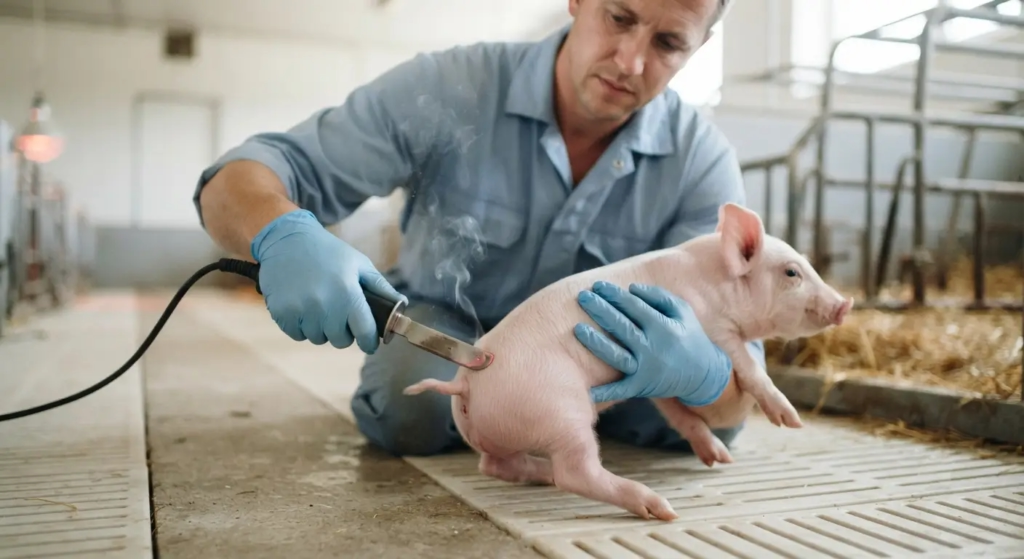
Hot cauterizing iron (docking iron):
- The preferred instrument for commercial pig tail docking — simultaneously cuts the tail and cauterizes the wound, reducing blood loss and providing some bacterial sealing of the wound site
- Appropriate temperature: The iron should be hot enough to cut cleanly and cauterize effectively but not so hot that it causes excessive charring beyond the immediate cut site — when a properly heated iron is applied to the tail, the cut should occur within 2–3 seconds with immediate cauterization of the wound edges
Surgical scissors or scalpel (alternative):
- Produces a clean cut without cauterization — requires separate wound disinfection after the procedure
- Higher blood loss than hot iron technique
- Appropriate for operations without a cauterizing iron, or where the iron is unavailable or non-functional
Blade cutting device (side-cutting pliers design):
- Available commercially for livestock procedures — provides clean cut but without cauterization; some designs include a heated element
The Correct Docking Length
Target: Remove approximately one-third to one-half of the tail length — leaving a stump of approximately 2–4 cm from the tail base.
The two-error traps:
- Too long (insufficient removal): A long tail stump provides essentially as much target as an undocked tail — if the docking is performed too conservatively, the tail biting risk reduction is minimal while the procedure’s welfare cost has still been incurred
- Too short (excessive removal): Removing too much tail — particularly cutting very close to the vertebral column — increases the risk of the surgical wound becoming a rectal prolapse point, impairs normal tail function and associated behavioral expression, and can create a stump wound that heals more slowly
Practical guidance: For a piglet at days 2–5, the target is cutting approximately halfway down the visible tail length — for a typical 10–12 cm tail, leaving 4–6 cm of stump from the tail base.
Step-by-Step Tail Docking Procedure
Step 1 — Prepare the instrument:
- For hot iron: heat to the correct temperature (test on a piece of wood — the iron should mark the wood decisively within 1–2 seconds without requiring excessive pressure)
- For scissors: ensure they are clean and sharp; blunt scissors crush rather than cut
Step 2 — Restrain the piglet:
- Hold the piglet securely with its tail accessible to the operator
- The tail docking position: the piglet held ventral-side down (belly facing the operator’s palm), with the tail clearly exposed — some operators prefer to have an assistant hold the piglet while they perform the docking
Step 3 — Identify the docking point:
- Measure approximately one-third to one-half of the tail length from the tail base — or simply identify the midpoint of the visible tail for a consistent target
Step 4 — Apply the hot iron or instrument:
- For hot iron: apply firmly and decisively to the identified point — hesitant, slow application causes more prolonged pain and poorer wound quality than a decisive single contact
- The cut should complete within 2–3 seconds for a correctly heated iron
- If the iron requires more than 3–4 seconds to complete the cut, it needs additional heating before proceeding
Step 5 — Inspect the wound:
- The wound edges should appear clean and cauterized (for hot iron) — no active bleeding
- Apply topical antiseptic spray (as available in the farm first-aid kit) to the wound site
Step 6 — Return the piglet to the litter and observe:
- Brief bleeding from the wound site for a few minutes after docking with scissors is normal; persistent or profuse bleeding warrants additional pressure and antiseptic management
- The docked stump should appear clean and dry within 24 hours
Ear Notching — The Permanent Identification System
Why Individual Identification Matters
The case for permanent individual pig identification has been made throughout the series — in vaccination records, breeding records, farrowing records, health treatment records, and performance tracking. A pig without permanent, readable identification that can be verified throughout its life in the herd is a pig whose records cannot be maintained with confidence, whose genetic parentage cannot be confirmed, and whose production history cannot be used for the selection decisions detailed in breeding guidance in this series.
Several identification systems exist (ear tags, electronic RFID tags, tattooing) but ear notching — the removal of small notches from the ear cartilage in specific positions corresponding to a numbering code — has the advantages of being permanently incorporated into the animal (no tag to fall out or be removed), readable without special equipment, and executable in the first days of life with simple instruments.
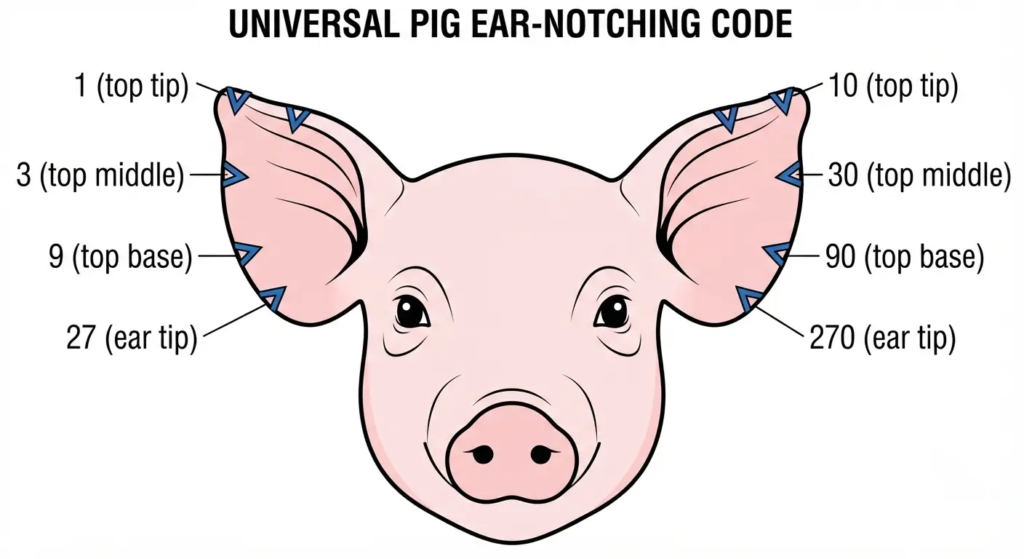
The Universal Ear Notching Code
Several numbering conventions exist for pig ear notching — the specific convention used should be adopted consistently across the farm and documented in the herd management records. The most widely used commercial convention in pig production allocates specific numerical values to notch positions in each ear:
Right ear (pig’s right, observer’s left when facing the pig):
- Notch in the top edge near the tip: 1
- Notch in the top edge in the middle: 3
- Notch in the top edge near the base: 9
- Notch in the bottom edge near the tip: 1
- Notch in the bottom edge in the middle: 3
- Notch in the tip of the ear: 27
Left ear (pig’s left, observer’s right):
- Notch in the top edge near the tip: 10
- Notch in the top edge in the middle: 30
- Notch in the top edge near the base: 90
- Notch in the bottom edge near the tip: 10
- Notch in the bottom edge in the middle: 30
- Notch in the tip of the ear: 270
The individual pig’s number is the sum of all notch values across both ears — allowing individual numbers from 1 to 999 (or beyond with modifications) to be encoded in the ear notch pattern.
Litter notching systems: Many commercial farms use a simplified system where notches encode the litter number rather than individual pig numbers within the litter — all piglets from the same litter receive the same notch pattern identifying that litter, while individual identification within the litter is recorded by birth order or birth weight in the farrowing records. This is simpler to implement than individual numbering but provides less complete individual traceability.
Ear Notching Equipment
Ear notching pliers:
- Standard tool for creating clean, precise notches in the ear cartilage
- Should produce a clean V-shaped or U-shaped notch — not a ragged tear that could be confused with a notch in an adjacent position
- Must be kept sharp and clean — dull notching pliers crush rather than cut cleanly, producing less distinct notches and greater tissue trauma
- Disinfect between litters (as with all processing equipment) — the wound created by ear notching is an entry point for infection, and notching pliers that carry pathogen contamination from one litter can transmit it to the next
Step-by-Step Ear Notching Procedure
Step 1 — Determine the notch pattern:
- Based on the farm’s numbering system, identify which notch positions are required for this piglet’s assigned number
- Have the pattern clearly planned before restraining the piglet — the procedure should be executed efficiently to minimize restraint time
Step 2 — Restrain the piglet:
- Hold the piglet firmly, with the ear to be notched accessible and flat
- For single-operator processing: hold the piglet between the operator’s arm and body, freeing both hands for the ear and the notching pliers
Step 3 — Position the pliers and notch:
- Place the cutting edge of the pliers at the precise position corresponding to the correct notch point — take a moment to confirm the position before closing the pliers
- Close the pliers with a single decisive action — clean, complete notch cuts are preferable to partial cuts requiring a second action at the same site
Step 4 — Repeat for each required notch position:
- Multiple notches may be required to encode the target number — complete each in sequence
Step 5 — Apply antiseptic:
- Topical antiseptic spray or iodine solution applied to each notch site immediately after cutting
Step 6 — Record the number:
- Confirm the notch pattern has been correctly applied before returning the piglet to the litter
- Record the pig number in the farrowing record alongside its birth order, sex, and birth weight
Castration of Male Piglets
The Case for Early Castration
Castration of male piglets intended for slaughter is practiced to prevent boar taint — the sex-hormone-related off-odor in the meat of intact male pigs that becomes increasingly pronounced as the animal approaches puberty. As discussed in nutrition guidance elsewhere in this series, intact boar production (not castrating males) is practiced in some commercial systems for the growth and FCR advantages of testosterone-driven lean deposition, but requires management of boar taint through either earlier slaughter or alternative approaches.
Where castration is the chosen approach (the majority of West and Central African commercial production contexts), early castration — in the first week of life — is associated with faster recovery, less pain and physiological stress, and a lower complication rate than later castration. The practical optimum is days 3–7 of life.
Pain Management for Castration
Castration is the most painful of the routine processing procedures, involving incision through the scrotal skin and severance of the spermatic cord. In welfare-conscious commercial systems, pain management is the appropriate standard:
Local anesthesia: Injectable lidocaine (1–2%) administered at the castration site (intratesticularly and subcutaneously over the scrotal skin) provides local anesthesia with onset within 5–10 minutes. This adds time to the processing procedure but substantially reduces the acute pain response during the procedure itself.
NSAID analgesia: Injectable meloxicam or oral ketoprofen (where available in forms appropriate for piglet use) administered before or immediately after castration provides post-procedural analgesia for the hours following the procedure — addressing the ongoing pain after local anesthesia has worn off.
The welfare standard: Where regulations require or the farm’s welfare standards specify pain management for castration, local anesthesia is the most practically accessible option that directly addresses the procedure’s pain during execution. The combination of pre-procedural local anesthesia and post-procedural NSAID provides the most comprehensive analgesia for the acute and post-acute pain periods.
Step-by-Step Castration Procedure
Step 1 — Confirm male sex and testicular descent:
- Both testicles should be palpable in the scrotum before proceeding — undescended testicles (cryptorchidism) present in one or both sides require veterinary assessment rather than standard castration technique
Step 2 — Prepare equipment:
- Surgical scissors or scalpel blade (clean, sharp)
- Povidone-iodine or chlorhexidine solution for site preparation and post-procedure wound disinfection
- Topical antiseptic spray
- Local anesthetic prepared and drawn up if using
Step 3 — Administer local anesthesia (if using):
- 0.5 mL of 2% lidocaine injected into each testicle and 0.5 mL subcutaneously into the overlying scrotal skin on each side
- Allow 5–10 minutes for anesthetic effect before proceeding
Step 4 — Restrain the piglet:
- The classic restraint for castration: hold the piglet in both hands with its back toward the operator’s chest, the piglet’s hindquarters facing upward, and the scrotum accessible from below
- Or: have an assistant hold the piglet in lateral recumbency with the upper hind leg held back to expose the scrotal area
Step 5 — Prepare the scrotal site:
- Wipe the scrotal skin with povidone-iodine or chlorhexidine on a clean swab
Step 6 — Make the incision:
- For each testicle: make a single incision through the scrotal skin directly over the testicle — the incision should be of adequate length to allow the testicle to pass through without tearing, but no longer
- The incision direction is typically longitudinal (parallel to the axis of the leg) for the least complication risk
- For two-incision technique (a separate incision over each testicle): commonly used and allows better control of each testicle separately
- For single-incision technique (a single midline incision through the scrotal raphé): faster but requires adequate midline placement to access both testicles through the single opening
Step 7 — Express and remove the testicle:
- Apply gentle pressure on either side of the incision to cause the testicle to present through the opening
- Grasp the exposed testicle firmly with the fingers and apply steady, firm traction to draw the spermatic cord out to an accessible length
- Sever the spermatic cord — for very young piglets (days 3–5), scraping the cord with the back of a scalpel blade until it separates (the “scraping” technique) is associated with less hemorrhage than a clean cut and is appropriate for this age; for older piglets or in larger litters where cord diameter is greater, cutting with scissors or scalpel at an appropriate distance from the body provides a clean separation
Step 8 — Inspect and treat the wounds:
- Confirm both testicles have been removed (check both incision sites)
- Apply topical antiseptic spray to all wound sites
- Allow wounds to remain open (do not suture) — scrotal wounds in young pigs heal adequately by secondary intention and suturing creates a higher complication risk than leaving them open
Step 9 — Return to the litter and monitor:
- Brief bleeding from the wound sites for a few minutes post-procedure is expected
- Persistent or profuse bleeding warrants manual pressure and, if not resolving, veterinary assessment
- Monitor in the 24 hours following castration for signs of excessive swelling, continued bleeding, or prolapse of intestinal content through the scrotal incision (extremely rare in correctly performed castration of young piglets, but warrants immediate veterinary attention if observed)
Post-Processing Monitoring
The 24-Hour and 48-Hour Checks
After any processing session, observe the litter at 24 and 48 hours for:
- Injection site reactions: Any significant swelling at iron injection sites (indicating subcutaneous placement) should be noted and, if the iron dose appears poorly absorbed, the injection repeated at a new site
- Wound infection signs: Redness, swelling, heat, or discharge at tail docking, ear notching, or castration sites beyond what is expected as normal post-procedural response warrants topical antiseptic treatment and monitoring; systemic signs (fever, marked lethargy, reduced nursing) warrant antibiotic treatment and veterinary assessment
- Tail stump assessment: A healthy tail stump should appear dry and beginning to desiccate within 24–48 hours; a stump showing moisture, discoloration, or continued bleeding warrants attention
- Overall litter condition: Processing procedures create cumulative stress — confirm the litter is nursing normally, that all processed piglets are showing normal activity and thermal regulation, and that no piglet has been displaced from normal litter integration
Record Completion
Complete the processing record for each litter before moving to the next litter:
- Iron injection: date, product, dose, batch number
- Procedures performed: tail docking, ear notching (with notch pattern recorded), castration (males confirmed)
- Any complications observed
- Any piglets not processed due to health concerns (and the reason for deferral)
This record is the documentation basis for the individual animal treatment history that informs subsequent health decisions, the vaccination record cross-referencing detailed in vaccination guidance, and the breeding records that use ear notch number as the primary animal identifier throughout the herd.
Summary
Piglet processing procedures — iron injection, tail docking, ear notching, and castration — are the management actions that establish the foundation for each pig’s health, individual identity, and welfare through its productive life. Each procedure has a correct technique that delivers its intended benefit with minimal welfare impact, and an incorrect technique that either fails to deliver the benefit (subcutaneous iron placement, insufficient tail removal) or creates unnecessary complications (incorrect docking length, imprecise ear notch placement, poor castration technique causing excessive hemorrhage).
The timing logic — combining all applicable procedures into a single session at days 3–5 of life, after colostrum intake is established but within the window where each procedure causes the least physiological disruption — minimizes the total number of handling events while keeping each individual procedure within its effective and appropriate age range.
Pain management, particularly for castration, reflects both the welfare standard appropriate to commercial livestock production and, in regulated markets, the legal requirements that apply to these procedures. Local anesthesia for castration and NSAID coverage for the post-acute pain period represent achievable, cost-effective approaches that align commercial pig production with the welfare standards increasingly expected by markets, regulators, and consumers.
Process correctly, at the right time, with the right equipment and the right technique. Each procedure performed well once is a decision that benefits the animal for the remainder of its productive life.